Tuesday 18 September 2018

Repeat table Header on all pages of a report

Hello reader, repeating table header across all pages of a report can be tricky especially if you are new to report design. It is not as difficult as it might seem. Here are the steps;


  1. Open the report in layout mode. The RDLC kayout of your report should be on display
  2. Go to column groups advance mode
  3. A series of static groups is created
  4. Select a static group for the row you would like to repeat
  5. Set the properties of that Row static group as follow

             KeepWithGroup ="After"
             RepeatOnNewPage = "True"


The procedure is true for both Report builder and Visual Studio 
Based on article published  here
Cheers!

Thursday 16 August 2018

Dynamics NAV 2017 login error "Invalid Object Name master.dbo.$ndo.$rsvproperty"

Hello reader, now that you are here, i know you got the error below.


The error is most likely caused by a license. To sort it simply ;

  • Open the database in development environment
  • Go to file>Database>alter
  • Click the integration Tab
  • Check "Save License in Database" check box
  • A window opens 
  • Browse for the Dynamics NAV license on your PC
  • Once you find it, select it and click open
  • Restart the NAV server.


You are good to go.
Cheers!!!

Friday 13 July 2018

Creating pages in AL (Dynamics NAV 2018/ Business Central) Part 3

Hello reader, as we continue to explore AL, remember we are following our project in the PDF I introduced to you in Part One.
In today's article, we will ;
  • create a card page,
  • Create a list page.
  • Link the two using CardPageID property
  • Add a menu item to the navigation pane of Order processor Role center
I recommend you create a new file "SeminarPages.al"
Paste the following code
page 50030 "Seminar Room Card"
{
    PageType = Card;
    SourceTable = "Seminar Room";

    layout
    {
       
        area(content)
        {
            group(General)//Pass the group name
            {
                field(Code;"Code")
                {
                   
                }
                 field(Name;"Name")
                {
                   
                }
               
                 field(Address;Address)
                {
                   
                }
                field("Address 2";"Address 2")
                {
                   
                }
                field(Allocation;Allocation)
                {

                }
                field("Internal/External";"Internal/External")
                {

                }
                field("Maximum Participants";"Maximum Participants")
                {

                }
                group("Communications")
                {
                    field(Contact;Contact)
                    {

                    }
                    field("Contact No.";"Contact No.")
                    {

                    }
                    field("Country/Region Code";"Country/Region Code")
                    {

                    }
                    field(City;City)
                    {

                    }
                    field(Comment;Comment)
                    {

                    }
                    field("E-Mail";"E-Mail")
                    {

                    }
                    field("Fax No.";"Fax No.")
                    {

                    }
                    field("home Page";"home Page")
                    {

                    }
                    field("Post Code";"Post Code")
                    {

                    }
                   

                }
            }
        }
    }

    actions
    {
        area(processing)
        {
            action(ActionName)
            {
                trigger OnAction();
                begin
                end;
            }
        }
    }
   
    var
        myInt : Integer;
}
page 50035 "Seminar Room List"
{
    PageType = List;
    CardPageId = "Seminar Room Card";
    SourceTable = "Seminar Room";

    layout
    {
        area(content)
        {
            repeater(Group)
            {
              
                field(Code;"Code")
                {
                   
                }
                 field(Name;"Name")
                {
                   
                }
               
                 field(Address;Address)
                {
                   
                }
                field("Address 2";"Address 2")
                {
                   
                }
                field(Allocation;Allocation)
                {

                }
                field("Internal/External";"Internal/External")
                {

                }
                field("Maximum Participants";"Maximum Participants")
                {

                }
                field(Contact;Contact)
                    {

                    }
                    field("Contact No.";"Contact No.")
                    {

                    }
                    field("Country/Region Code";"Country/Region Code")
                    {

                    }
                    field(City;City)
                    {

                    }
                    field(Comment;Comment)
                    {

                    }
                    field("E-Mail";"E-Mail")
                    {

                    }
                    field("Fax No.";"Fax No.")
                    {

                    }
                    field("home Page";"home Page")
                    {

                    }
                    field("Post Code";"Post Code")
                    {

                    }
            }
        }
        area(factboxes)
        {
        }
    }

    actions
    {
        area(processing)
        {
            action(ActionName)
            {
                trigger OnAction();
                begin
                end;
            }
        }
    }
}
pageextension 50040 "Order Processor Extension" extends "Order Processor Role Center"
{
    layout
    {
        // Add changes to page layout here
       
    }

    actions
    {
        // Add changes to page actions here
        addlast(Embedding)//Adding an action to our Role center Navigation pane
        {
            action("Seminar Rooms")// The new navigation menu item
            {
                RunObject = page "Seminar Room List";
            }
        }

    }
   
    var
        myInt : Integer;
}

Save and publish.
Restart your Dynamics NAV instance.
There you find a new navigation menu item.
Good luck

Thursday 12 July 2018

Creating Tables in AL.Seminar Project(Dynamics NAV 2018/ Business Central) PART 2

If you read through our PDF in part one, you discover we had to modify tables 97,279, and 280 before creating the seminar room table. In this part we add code to our project to modify the tables i stated above as per the requirements in the pdf.
Simply copy and paste this code at the end of the file we created in part one.

// Modifying table 97 Comment Line. We cant modify fields in AL
//This part preceeds the seminar room table
tableextension 50005 CommentLineExtension extends "Comment Line"
{
    fields
    {
        // Add changes to table fields here
        field(50000;"Table Names";Option)
        {
            OptionMembers = ";Seminar Room" ;
        }
    }
   
    var
        myInt : Integer;
}
//Modifying table Extended Text Header (279)
tableextension 50010 ExtendedTextHeaderExtension extends "Extended Text Header"
{
    fields
    {
        // Add changes to table fields here
         field(50000;"Table Names";Option)
        {
            OptionMembers = ";Seminar Room" ;
        }

    }
   
    var
        myInt : Integer;
}
//Modifying table Extended Text Line (280)
tableextension 50015 ExtendedTextLineExtension extends "Extended Text Line"
{
    fields
    {
        // Add changes to table fields here
         field(50000;"Table Names";Option)
        {
            OptionMembers = ";Seminar Room" ;
        }
    }
   
    var
        myInt : Integer;
}

Wednesday 11 July 2018

Creating Tables in AL.Seminar Project(Dynamics NAV 2018/ Business Central) PART 1

Hello Reader, I would like to share with you an implementation of AL development following one of Microsoft's demo project. The Seminar project from earlier versions (2009 R2). We shall develop this project using AL extensions.
Please access the detail pdf spelling out the Seminar assignment in details. Click here to view

We shall straight away start with the seminar room table as stated in the pdf you just read.

  • First create an AL project. 
  • Edit the app.json file idRange to 50000 to 59999
  • Edit your Launch.json accordingly
  • Right click Helloworld.al file and select rename. SeminarExt.al
  • You need to dowload symbols
  • Delete everything from the file and paste there the code below

Here is the code;
table 50000 "Seminar Room"
{    fields
    {
        field(10;Code;Code[10])
        {
            NotBlank = true;
        }
        field(20;Name;Text[50])
        {
        }
        field(30;Address;Text[50])
        {          
        }
        field(40;"Address 2";Text[50])
        {           
        }
         field(50;City;Text[30])
        {           
        }
         field(60;"Post Code";Code[20])
        {
            TableRelation = "Post Code".Code;// Table relation to post Code table
        }
         field(70;"Country/Region Code";Code[10])
        {
            TableRelation  = "Country/Region".Code;           
        }
         field(80;"Phone No.";Text[30])
        {
            ExtendedDatatype = PhoneNo;// The system will capture this text as a phone no.
        }
         field(90;"Fax No.";Text[30])
        {
            ExtendedDatatype = PhoneNo;
        }
         field(100;"Name 2";Text[50])
        {           
        }
         field(110;"Contact";Text[50])
        {           
        }
         field(120;"E-Mail";Text[80])
        {
            ExtendedDatatype = EMail;
        }
         field(130;"home Page";Text[90])
        {
            ExtendedDatatype = URL;
        }
         field(140;"Maximum Participants";Integer)
        {           
        }
         field(150;"Allocation";Decimal)
        {           
        }
        field(160;"Resource No.";Code[20])
        {
            TableRelation = Resource where (Type=const(Machine));
        }
         field(170;"Comment";Boolean)
        {           
        }
         field(180;"Internal/External";Option)
        {
          OptionMembers = "Internal;External"; 
        }
         field(190;"Contact No.";Code[20])
        {
            TableRelation = Contact."No.";            
        }
    }

    keys
    {
        key(PK;Code)
        {
            Clustered = true;
        }
    }
   
    var
        myInt : Integer;

    trigger OnInsert();
    begin
    end;

    trigger OnModify();
    begin
    end;

    trigger OnDelete();
    begin
    end;

    trigger OnRename();
    begin
    end;
}

Remember to save.
Please refer to this article incase you don't know to create an al project

Wednesday 4 July 2018

Dynamics NAV -Developing our first extension

Hello reader, now that we have prepared our development environment ready for extensions, it's time we create our first extension.
Incase you have not prepared the environment for extensions development please check blog archive for "Dynamics NAV extensions development"

Today we will create our first extension for Dynamics NAV 2018/ Business Central.
First some rules;

  • Run your dynamics NAV client
  • Run the microsoft Dynamics NAV configuration manager.
  • Enable developer service endpoint and loading symbol references at server. These two should be checked i the development fast tab.


  • Run the instance again and make sure it is working fine.


Now it is time to create our project.

  • Run VS code
  • Once the IDE is fully fired up, run the command CTRL + SHIFT + P from the command bar.
  • Select AL GO


  • A path is displayed in the command bar. It is the path to where the new project will be created
  • Edit the last piece of the address, it is the project name. I will call mine ALTEST1
  • Once that is done, hit enter on your keyboard.


  • The IDE will initialise and create all the files needed for the start of our project
  • Once it is done, check your left. you will see a file HelloWorld.al
  • That is our al file

Note the message. It will be displayed every time we initiate our extension


  • Navigate to launch.json. This file contains the server settings.
  • Edit

name = "localhost" > Refers to name of your PC/server name
server = "http://localhost" > Address of your server where Dynamics NAV service is running
server instance = "DynamicsNAV110" > The instance of Dynamics NAV where your extension will be executed
authentication = "Windows" > The authentication that shall be used to access Dynamics NAV server
startupObjectID = 22 > The object will invoke execution of our extension


  • Next we need to download symbols. This is similar to getting all references in one place
  • Go to command bar and type
  • CTRL + SHIFT + P and select download symbols


Once the symbols have downloaded, the system will display a series of messages in output window at the bottom. Please note that a failure may be caused by NAV server being off. Make sure you run it before this step

Next Package and Publish
On the command bar press CTRL +SHIFT + P select publish


Now u have published your Extension. Its time for you to check it out in Dynamics NAV 2018 client


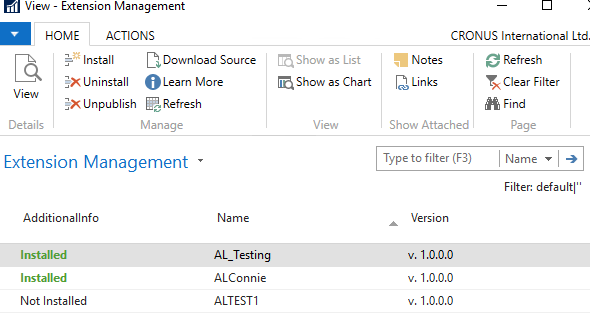
  • Search for "Extension management"


  • Now you can verify that the Extension is installed.


  • Run the Customer List page. page 22
  • Now you can see the message box


That marks the end of our first extension. Let  us catch up in the next one.
Good luck!

Tuesday 3 July 2018

Dynamics NAV extensions development

How are you today. I have taken quite a while without writing on this blog. For those of us from Uganda, i hope you have cleared your taxes on social media ? Let's get to business.

I shared about extensions one of the articles. If you want to know about extensions please read here.

  1. Extensions is the new way of customizing our Dynamics NAV (Dynamics Business Central). Our code will be written in a new language AL. Previously it has been in CAL
  2. Visual Studio Code (VS Code) will be our IDE for developing extensions.

Since it is our very first attempt on extensions. Let me share with you what you need to prepare for AL development.

You will need;

  • Dynamics NAV 2018(Developer components) installed on your machine. We shall first test our extensions using the NAV instance you have installed
  • VS Code IDE. Click for download
  • You need to install AL language extensions in your VS code IDE
  • You also need the AL Language formatter installed in your VS code IDE.


The AL Language extension enables you to write AL code using your IDE while the formatter enables you to format your code.

The instructions on how to install VS code are on the VS code website. Also find the instructions of installing Dynamics NAV 2018 on the Microsoft website.

Once you have installed Dynamics NAV 2018 and VS code IDE continue with these steps to enable your VS Code work with AL extensions
The first time you run your VS code, it will look like this. There will be no tab "Recent projects"

To install AL extension into your VS code;
  • On your IDE select the extensions tab. It is the square just below the circle


  • Go to assist edit up and select install from Vsix
  • Browse for AL language extension present in your NAV setup folder. Mine was in DynamicsNAV setup folder\NAV 2018\ModernDev\program files\Microsoft Dynamics NAV\110\Modern Development Environment


Once you find the file [ALLanguage] select it and install.

Once you have installed Dynamics NAV 2018 Developer components along with VS code IDE, AL extension and AL formatter. You are ready to start your coding.
Thank you and see you in the next blog where we shall create our first AL extension.


Monday 11 June 2018

Dynamics NAV error "Unknown language was selected 8192"

Hello reader, i came across the error above upon installing Dynamics NAV 2017 and attempting to run the development environment. It's quite frustrating as the online blogs rarely share the error.
After a while looking, i landed on a forum "Dynamics NAV development community" that shared something.

Solution

Make sure your windows regional language settings have the same language as the Dynamics NAV language for the setup you have installed.
I installed Dynamics NAV for United States(English) but my regional language settings in windows was English(Uganda). I simply changed the regional language setting to United states (English) then Reboot my system.
Booooom! The error was no more!
Follow this link for more
Special credit to http://community.dynamics.com/nav


Wednesday 6 June 2018

Extensions in Microsoft Dynamics NAV

Hello reader, we recently had a training in Nairobi. The main purpose of the event was to discuss the future of Dynamics NAV & extensions took up most of the time. NAV has come a long way & Microsoft is making it better year in year out. Here is what you will do with extensions.


What are extensions ?

Dynamics NAV Extensions are packages that contain additional functionality,
report layouts (at least starting in NAV 2017), permissions, and more.
The packages can be easily installed, uninstalled and upgraded without
affecting the Dynamics NAV source code. This will save us from the burden associated with system upgrades.
Dynamics NAV solutions can be customized by partners, value-added resellers (VARs),
and even some customers. This is an important benefit of the product and the service
continues to be available. However, it has traditionally been carried out by over
layering the application code. The move to the cloud with more agile servicing and
frequent updates requires a less intrusive customization model that makes updates less
likely to impact custom solutions. This new model is called Dynamics NAV Extensions and
will probably replace customization.

What are the benefits of extensions ?
Dynamics NAV Extensions are a way for Microsoft Dynamics NAV developers and ISVs to extend the functionality of NAV without modifying Microsoft’s original source code. With the new model,when you come to upgrade Dynamics NAV with a cumulative update, you no longer need to merge all the customized objects. That means less upgrade issues.

With NAV Extensions, you can add functionality without changing the standard solution from Microsoft. This has the obvious advantage that major NAV upgrade projects are no longer necessary. Once you are using Extensions, the customizations no longer represent a problem when upgrading to the latest version of the solution.

If you want to prepare for this new model, you should start to work with Dynamics NAV Extensions today.

In my next blog, i will share about VS code IDE and more on extensions. There is a lot coming as Microsoft migrates us to the cloud with Dynamics 365. 

G


Tuesday 22 May 2018

Remote Desktop Connection Error "An authentication error has occurred. The function requested is not supported Remote computer: 165.168.2.102 This could be due to CredSSP encryption oracle remediation."

Hello reader, this time this blog article is not directly related to Dynamics NAV as usual. But in our routine work we encounter and troubleshoot errors that could originate from SQL server, Windows Server, Windows Client OS or Dynamics NAV itself.
Today i encountered the error below when i tried to remote to a server to sort out someone that needed help.


Luckily i looked up the web and landed on a blog with a quick fix.
Please note that my client PC is running Windows 10.
To fix the error, simply

  • edit client Windows’ local group policy (gpedit.msc):
  • Under Computer Configuration -> Administrative Templates -> System -> Credentials Delegation, there is a setting “Encryption Oracle Remediation”. Its default value is “Not configured”. Just change it to “Enabled”, and set “Protection Level” as “Vulnerable”.
For a detailed explanation and steps to follow please click here
Special credits to; Dixin

DYNAMICS NAV ERROR "The Service Principal Name (Delegation) configuration has been set incorrectly. "

Hello reader, today i received the above error when i attempted to login to Dynamics NAV server from my client PC.
Before i encountered the error everything worked correctly a few days back. I realized i had updated my password from the domain user account which i use to access NAV on the server.


My PC was set to use WINDOWS authentication.
I realised that my username and password i used to login to my PC is different from the domain account login information for accessing Dynamics NAV server.
I suspected the difference could have been the problem after checking up a few blogs online.

If you have encountered a similar error try this to fix.

  • Change your Clients credential type to UserName on your client PC.
  • Once you run NAV, it will prompt you for username and password
  • Login using the domain account information you use to access the NAV server instance on your Server.
Click here for additional info

if you don't know how to change the client credential type follow these steps;

  1. Open file explorer and navigate to C:\Users\[Current User]\AppData\Roaming\Microsoft\Microsoft Dynamics NAV\[folder 110 for NAV 2018, 90 for NAV 2017, 71 for NAV 2013]
  2. open clientsettings.config file
  3. Update clientCredentialType="UserName"
  4. Save and exit
  5. Run NAV again and it will prompt you for username & password
Please note that the square brackets above are a place holder
here is mine C:\Users\Mark\AppData\Roaming\Microsoft\Microsoft Dynamics NAV\110


You should be able to login successfully.
Good luck

Tuesday 27 February 2018

MICROSOFT DYNAMICS NAV (SQL ERROR)

Hello, today i will share something slightly away from Microsoft Dynamics NAV but it's very important. We all know Dynamics NAV can not be accessed when SQL server is not running. I woke up to this error "Cannot connect to WMI Provider.You do not have permission or the server is unreachableNote that you can only manage SQL Server 2005 and later servers with SQL Server Configuration ManagerInvalid class[0x80041010]." upon running SQL configuration manager.
It is very frustrating to start with system errors even before you begin development.
If you get the same error just do what am about to describe.


Solution

  • Open command line as administrator
  • Navigate tC:\Program Files (x86)\Microsoft SQL Server\Number\Shared\
  • Run command "mofcomp sqlmgmproviderxpsp2up.mof"
  • You will receive the following message when your command is successful.


The value of Number depends on the version of SQL Server:nnn

Microsoft SQL Server 2012110
Microsoft SQL Server 2008 R2100
Microsoft SQL Server 2008100
Microsoft SQL Server 200590

 For details click here 

Thursday 8 February 2018

MICROSOFT DYNAMICS NAV UPGRADES MADE EASIER AND FASTER USING EXTENSIONS

Hello reader, technology is changing every other day. The good news is that Microsoft has not been left behind in this race. I have only worked with Dynamics NAV for a mere 2 and half years, those of you that are familiar with it since the early days can testify this product has become even better. Lets dive back to Extensions and what it means to the future of Dynamics NAV Upgrade.


Dynamics NAV Extensions are a way for Microsoft Dynamics NAV developers and ISVs to extend the functionality of NAV without modifying Microsoft’s original source code. With the new model, when you come to upgrade Dynamics NAV with a cumulative update, you no longer need to merge all the customized objects. That means less upgrade issues.
With NAV Extensions, you can add functionality without changing the standard solution from Microsoft. This has the obvious advantage that major NAV upgrade projects are no longer necessary. Once you are using Extensions, the customizations no longer represent a problem when upgrading to the latest version of the solution.
If you want to prepare for this new model, you should start to work with Dynamics NAV Extensions today.

Barriers to editing Dynamics NAV extensions

Dynamics NAV Extensions are packages that contain additional functionality, report layouts (at least starting in NAV 2017), permissions, and more. The packages can be easily installed, uninstalled and upgraded without affecting the Dynamics NAV source code.
Once the Dynamics NAV extension package has been created, it is no longer easy for others to view the code of the extension, which means that your code is protected. You can view the source code of an extension through the debugger, but you cannot access the code through the development environment and you can’t modify an extension unless you have the source code.
Technically, there is no real problem. The new solution will work and the customer will be able to use the custom functionality. However, if another party wanted to further modify the functionality, it would not be possible because the functionality can only be modified if the developer has the source code.

How Dynamics NAV Extensions can make Dynamics NAV upgrades easier

We believe that in most cases, NAV Extensions can help developers to upgrade without any problem. Why in most? Because during any Dynamics NAV upgrade we currently carry out (which is classic, nothing to do with Extensions), we can upgrade the most part of the code without conflicts.
What about the exceptions? There are just a few scenarios where you may need to rethink your solution. Here are some examples:
  • When new functionality in an upgraded version of NAV can replace your extension. However, they probably can co-exist.
  • When Microsoft redesigns part of a solution. Even this doesn’t need to be a major problem. If, for example, you are upgrading to NAV2017, a major redesign of CU80 isn’t that much of a problem thanks to the hooks pattern. Decent code design always helps. If you have been using extensions, you would have been using events anyway, so that’s even less of a problem.

Visual Studio Code and Dynamics NAV Extensions.

  • The Microsoft NAV team has created a new VS Code extension that enables the creation of objects in AL language. But beware; creating a VS Code extension for a completely new language is not straightforward! It requires the creation of a model to support intelligence and the creation of a new compiler. That sounds easy, but it is not.

Microsoft tools for automatic migration to Dynamics NAV Extensions

To help develop solutions for this new programming environment, you can use a set of new Microsoft developer tools to build, test, and deploy NAV Extensions.
Microsoft In-App Designer
In the client, you can switch to In-App Designer mode. This enables you to change the look and feel of the client quickly and easily. Using this tool, you can define the elements (such as fields or groups) that appear on a page and change how they are displayed. You can also use In-App Designer as an interactive tool to create extensions based on changes you make in the client.
Microsoft In-App Designer includes a wide range of important features, such as:
  • Adding a field from the source table to a page
  • Moving a field to another position on a page
  • Removing a field from a page
  • Previewing your design in desktop, tablet, and phone clients
  • Saving the changes for the tenant or saving as an extension package file in Visual Studio Code.
  • Microsoft Dynamics NAV Developer Preview 3 (Coming soon)
  • Changing the caption of a field on the page.
  • Adding, moving, renaming, and removing an action.
  • Adding, moving, and removing page parts.
  • Adding new pages
See full article here
Special credit to  www.simplanova.com