Incase you have not prepared the environment for extensions development please check blog archive for "Dynamics NAV extensions development"
Today we will create our first extension for Dynamics NAV 2018/ Business Central.
First some rules;
- Run your dynamics NAV client
- Run the microsoft Dynamics NAV configuration manager.
- Enable developer service endpoint and loading symbol references at server. These two should be checked i the development fast tab.
- Run the instance again and make sure it is working fine.
Now it is time to create our project.
- Run VS code
- Once the IDE is fully fired up, run the command CTRL + SHIFT + P from the command bar.
- Select AL GO
- A path is displayed in the command bar. It is the path to where the new project will be created
- Edit the last piece of the address, it is the project name. I will call mine ALTEST1
- Once that is done, hit enter on your keyboard.
- The IDE will initialise and create all the files needed for the start of our project
- Once it is done, check your left. you will see a file HelloWorld.al
- That is our al file
Note the message. It will be displayed every time we initiate our extension
- Navigate to launch.json. This file contains the server settings.
- Edit
name = "localhost" > Refers to name of your PC/server name
server = "http://localhost" > Address of your server where Dynamics NAV service is running
server instance = "DynamicsNAV110" > The instance of Dynamics NAV where your extension will be executed
authentication = "Windows" > The authentication that shall be used to access Dynamics NAV server
startupObjectID = 22 > The object will invoke execution of our extension
- Next we need to download symbols. This is similar to getting all references in one place
- Go to command bar and type
- CTRL + SHIFT + P and select download symbols
Once the symbols have downloaded, the system will display a series of messages in output window at the bottom. Please note that a failure may be caused by NAV server being off. Make sure you run it before this step
Next Package and Publish
On the command bar press CTRL +SHIFT + P select publish
Now u have published your Extension. Its time for you to check it out in Dynamics NAV 2018 client
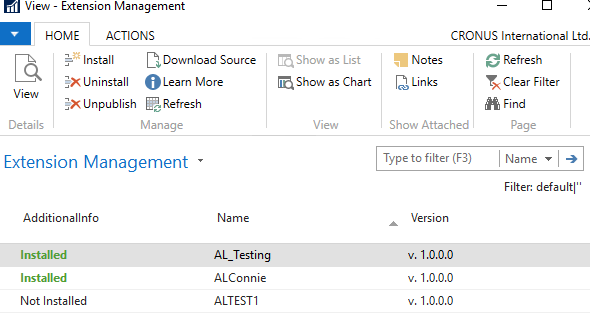
- Search for "Extension management"
- Now you can verify that the Extension is installed.
- Run the Customer List page. page 22
- Now you can see the message box
That marks the end of our first extension. Let us catch up in the next one.
Good luck!


No comments:
Post a Comment