Friday 13 July 2018

Creating pages in AL (Dynamics NAV 2018/ Business Central) Part 3

Hello reader, as we continue to explore AL, remember we are following our project in the PDF I introduced to you in Part One.
In today's article, we will ;
  • create a card page,
  • Create a list page.
  • Link the two using CardPageID property
  • Add a menu item to the navigation pane of Order processor Role center
I recommend you create a new file "SeminarPages.al"
Paste the following code
page 50030 "Seminar Room Card"
{
    PageType = Card;
    SourceTable = "Seminar Room";

    layout
    {
       
        area(content)
        {
            group(General)//Pass the group name
            {
                field(Code;"Code")
                {
                   
                }
                 field(Name;"Name")
                {
                   
                }
               
                 field(Address;Address)
                {
                   
                }
                field("Address 2";"Address 2")
                {
                   
                }
                field(Allocation;Allocation)
                {

                }
                field("Internal/External";"Internal/External")
                {

                }
                field("Maximum Participants";"Maximum Participants")
                {

                }
                group("Communications")
                {
                    field(Contact;Contact)
                    {

                    }
                    field("Contact No.";"Contact No.")
                    {

                    }
                    field("Country/Region Code";"Country/Region Code")
                    {

                    }
                    field(City;City)
                    {

                    }
                    field(Comment;Comment)
                    {

                    }
                    field("E-Mail";"E-Mail")
                    {

                    }
                    field("Fax No.";"Fax No.")
                    {

                    }
                    field("home Page";"home Page")
                    {

                    }
                    field("Post Code";"Post Code")
                    {

                    }
                   

                }
            }
        }
    }

    actions
    {
        area(processing)
        {
            action(ActionName)
            {
                trigger OnAction();
                begin
                end;
            }
        }
    }
   
    var
        myInt : Integer;
}
page 50035 "Seminar Room List"
{
    PageType = List;
    CardPageId = "Seminar Room Card";
    SourceTable = "Seminar Room";

    layout
    {
        area(content)
        {
            repeater(Group)
            {
              
                field(Code;"Code")
                {
                   
                }
                 field(Name;"Name")
                {
                   
                }
               
                 field(Address;Address)
                {
                   
                }
                field("Address 2";"Address 2")
                {
                   
                }
                field(Allocation;Allocation)
                {

                }
                field("Internal/External";"Internal/External")
                {

                }
                field("Maximum Participants";"Maximum Participants")
                {

                }
                field(Contact;Contact)
                    {

                    }
                    field("Contact No.";"Contact No.")
                    {

                    }
                    field("Country/Region Code";"Country/Region Code")
                    {

                    }
                    field(City;City)
                    {

                    }
                    field(Comment;Comment)
                    {

                    }
                    field("E-Mail";"E-Mail")
                    {

                    }
                    field("Fax No.";"Fax No.")
                    {

                    }
                    field("home Page";"home Page")
                    {

                    }
                    field("Post Code";"Post Code")
                    {

                    }
            }
        }
        area(factboxes)
        {
        }
    }

    actions
    {
        area(processing)
        {
            action(ActionName)
            {
                trigger OnAction();
                begin
                end;
            }
        }
    }
}
pageextension 50040 "Order Processor Extension" extends "Order Processor Role Center"
{
    layout
    {
        // Add changes to page layout here
       
    }

    actions
    {
        // Add changes to page actions here
        addlast(Embedding)//Adding an action to our Role center Navigation pane
        {
            action("Seminar Rooms")// The new navigation menu item
            {
                RunObject = page "Seminar Room List";
            }
        }

    }
   
    var
        myInt : Integer;
}

Save and publish.
Restart your Dynamics NAV instance.
There you find a new navigation menu item.
Good luck

Thursday 12 July 2018

Creating Tables in AL.Seminar Project(Dynamics NAV 2018/ Business Central) PART 2

If you read through our PDF in part one, you discover we had to modify tables 97,279, and 280 before creating the seminar room table. In this part we add code to our project to modify the tables i stated above as per the requirements in the pdf.
Simply copy and paste this code at the end of the file we created in part one.

// Modifying table 97 Comment Line. We cant modify fields in AL
//This part preceeds the seminar room table
tableextension 50005 CommentLineExtension extends "Comment Line"
{
    fields
    {
        // Add changes to table fields here
        field(50000;"Table Names";Option)
        {
            OptionMembers = ";Seminar Room" ;
        }
    }
   
    var
        myInt : Integer;
}
//Modifying table Extended Text Header (279)
tableextension 50010 ExtendedTextHeaderExtension extends "Extended Text Header"
{
    fields
    {
        // Add changes to table fields here
         field(50000;"Table Names";Option)
        {
            OptionMembers = ";Seminar Room" ;
        }

    }
   
    var
        myInt : Integer;
}
//Modifying table Extended Text Line (280)
tableextension 50015 ExtendedTextLineExtension extends "Extended Text Line"
{
    fields
    {
        // Add changes to table fields here
         field(50000;"Table Names";Option)
        {
            OptionMembers = ";Seminar Room" ;
        }
    }
   
    var
        myInt : Integer;
}

Wednesday 11 July 2018

Creating Tables in AL.Seminar Project(Dynamics NAV 2018/ Business Central) PART 1

Hello Reader, I would like to share with you an implementation of AL development following one of Microsoft's demo project. The Seminar project from earlier versions (2009 R2). We shall develop this project using AL extensions.
Please access the detail pdf spelling out the Seminar assignment in details. Click here to view

We shall straight away start with the seminar room table as stated in the pdf you just read.

  • First create an AL project. 
  • Edit the app.json file idRange to 50000 to 59999
  • Edit your Launch.json accordingly
  • Right click Helloworld.al file and select rename. SeminarExt.al
  • You need to dowload symbols
  • Delete everything from the file and paste there the code below

Here is the code;
table 50000 "Seminar Room"
{    fields
    {
        field(10;Code;Code[10])
        {
            NotBlank = true;
        }
        field(20;Name;Text[50])
        {
        }
        field(30;Address;Text[50])
        {          
        }
        field(40;"Address 2";Text[50])
        {           
        }
         field(50;City;Text[30])
        {           
        }
         field(60;"Post Code";Code[20])
        {
            TableRelation = "Post Code".Code;// Table relation to post Code table
        }
         field(70;"Country/Region Code";Code[10])
        {
            TableRelation  = "Country/Region".Code;           
        }
         field(80;"Phone No.";Text[30])
        {
            ExtendedDatatype = PhoneNo;// The system will capture this text as a phone no.
        }
         field(90;"Fax No.";Text[30])
        {
            ExtendedDatatype = PhoneNo;
        }
         field(100;"Name 2";Text[50])
        {           
        }
         field(110;"Contact";Text[50])
        {           
        }
         field(120;"E-Mail";Text[80])
        {
            ExtendedDatatype = EMail;
        }
         field(130;"home Page";Text[90])
        {
            ExtendedDatatype = URL;
        }
         field(140;"Maximum Participants";Integer)
        {           
        }
         field(150;"Allocation";Decimal)
        {           
        }
        field(160;"Resource No.";Code[20])
        {
            TableRelation = Resource where (Type=const(Machine));
        }
         field(170;"Comment";Boolean)
        {           
        }
         field(180;"Internal/External";Option)
        {
          OptionMembers = "Internal;External"; 
        }
         field(190;"Contact No.";Code[20])
        {
            TableRelation = Contact."No.";            
        }
    }

    keys
    {
        key(PK;Code)
        {
            Clustered = true;
        }
    }
   
    var
        myInt : Integer;

    trigger OnInsert();
    begin
    end;

    trigger OnModify();
    begin
    end;

    trigger OnDelete();
    begin
    end;

    trigger OnRename();
    begin
    end;
}

Remember to save.
Please refer to this article incase you don't know to create an al project

Wednesday 4 July 2018

Dynamics NAV -Developing our first extension

Hello reader, now that we have prepared our development environment ready for extensions, it's time we create our first extension.
Incase you have not prepared the environment for extensions development please check blog archive for "Dynamics NAV extensions development"

Today we will create our first extension for Dynamics NAV 2018/ Business Central.
First some rules;

  • Run your dynamics NAV client
  • Run the microsoft Dynamics NAV configuration manager.
  • Enable developer service endpoint and loading symbol references at server. These two should be checked i the development fast tab.


  • Run the instance again and make sure it is working fine.


Now it is time to create our project.

  • Run VS code
  • Once the IDE is fully fired up, run the command CTRL + SHIFT + P from the command bar.
  • Select AL GO


  • A path is displayed in the command bar. It is the path to where the new project will be created
  • Edit the last piece of the address, it is the project name. I will call mine ALTEST1
  • Once that is done, hit enter on your keyboard.


  • The IDE will initialise and create all the files needed for the start of our project
  • Once it is done, check your left. you will see a file HelloWorld.al
  • That is our al file

Note the message. It will be displayed every time we initiate our extension


  • Navigate to launch.json. This file contains the server settings.
  • Edit

name = "localhost" > Refers to name of your PC/server name
server = "http://localhost" > Address of your server where Dynamics NAV service is running
server instance = "DynamicsNAV110" > The instance of Dynamics NAV where your extension will be executed
authentication = "Windows" > The authentication that shall be used to access Dynamics NAV server
startupObjectID = 22 > The object will invoke execution of our extension


  • Next we need to download symbols. This is similar to getting all references in one place
  • Go to command bar and type
  • CTRL + SHIFT + P and select download symbols


Once the symbols have downloaded, the system will display a series of messages in output window at the bottom. Please note that a failure may be caused by NAV server being off. Make sure you run it before this step

Next Package and Publish
On the command bar press CTRL +SHIFT + P select publish


Now u have published your Extension. Its time for you to check it out in Dynamics NAV 2018 client


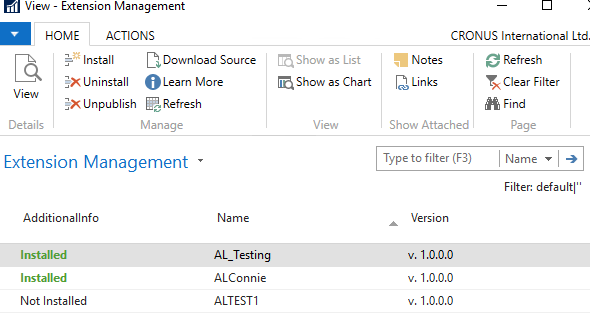
  • Search for "Extension management"


  • Now you can verify that the Extension is installed.


  • Run the Customer List page. page 22
  • Now you can see the message box


That marks the end of our first extension. Let  us catch up in the next one.
Good luck!

Tuesday 3 July 2018

Dynamics NAV extensions development

How are you today. I have taken quite a while without writing on this blog. For those of us from Uganda, i hope you have cleared your taxes on social media ? Let's get to business.

I shared about extensions one of the articles. If you want to know about extensions please read here.

  1. Extensions is the new way of customizing our Dynamics NAV (Dynamics Business Central). Our code will be written in a new language AL. Previously it has been in CAL
  2. Visual Studio Code (VS Code) will be our IDE for developing extensions.

Since it is our very first attempt on extensions. Let me share with you what you need to prepare for AL development.

You will need;

  • Dynamics NAV 2018(Developer components) installed on your machine. We shall first test our extensions using the NAV instance you have installed
  • VS Code IDE. Click for download
  • You need to install AL language extensions in your VS code IDE
  • You also need the AL Language formatter installed in your VS code IDE.


The AL Language extension enables you to write AL code using your IDE while the formatter enables you to format your code.

The instructions on how to install VS code are on the VS code website. Also find the instructions of installing Dynamics NAV 2018 on the Microsoft website.

Once you have installed Dynamics NAV 2018 and VS code IDE continue with these steps to enable your VS Code work with AL extensions
The first time you run your VS code, it will look like this. There will be no tab "Recent projects"

To install AL extension into your VS code;
  • On your IDE select the extensions tab. It is the square just below the circle


  • Go to assist edit up and select install from Vsix
  • Browse for AL language extension present in your NAV setup folder. Mine was in DynamicsNAV setup folder\NAV 2018\ModernDev\program files\Microsoft Dynamics NAV\110\Modern Development Environment


Once you find the file [ALLanguage] select it and install.

Once you have installed Dynamics NAV 2018 Developer components along with VS code IDE, AL extension and AL formatter. You are ready to start your coding.
Thank you and see you in the next blog where we shall create our first AL extension.